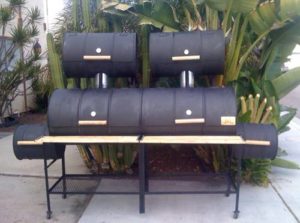
Summer’s almost here and you know what that means—grilling season! There’s no better excuse to avoid a sweltering, stuffy kitchen, but if you’re feeling adventurous, this could be the summer to kick things up a notch with a DIY smoker.
Now, you can smoke meat on a gas grill and it’ll be tasty for sure. Still, nothing compares to true “slow and low” meat smoking in a dedicated smoker, which can cost up to $1,000 brand new. A better bet is making the smoker yourself. It’s actually not that complicated—it doesn’t even require welding skills!
Step One: Gather your materials
You’ll need a 55-gallon drum with a removable lid (check out our collection, here), plus a step drill for drilling holes in metal. You’ll also need:
- A 22.5-inch Weber grill grate and a grill lid
- Four ¾-inch brass ball valves
- A fire basket (see step 4)
- A pit thermometer
- Four each of the following to mount the grate:
- 1.5″ x 1/4″ bolts
- 1/4″ nuts
- 1/4″ lock washers
Step Two: Drill ventilation holes
Controlling airflow is the key to maintaining the temperature inside your smoker—the more air allowed in, the hotter the smoker will get. Most smokers should settle in around 200-250 degrees, 300-325 degrees max unless you’re going for the “blackened” effect.
To find the right spacing for the holes, wrap a string around the outside of the barrel to measure the circumference. Divide the circumference by three and mark the string at each of those intervals. Then drill a ¾ inch ventilation hole at each point, plus one more about 3 inches above the base of the drum for the thermometer. Install the ball valves and thermometer.
Step Three: Mount the grate
You’ll want to mount the grate about 7 inches below the top of the drum to leave room for larger cuts of meat. Using that same circumference string, divide the length by four and drill holes for the ¼ inch bolts at that interval again. Install the bolt from the outside of each hole, place a lock washer on the inside of each bolt, and tighten the nut. The grate will sit nicely on top of the bolts.
Step Four: Make the fire basket
The basket holds your charcoal and wood in the bottom of the drum, but it needs to allow ash to fall through as the coal burns down. The basket also allows air to surround the burning coals, which results in an efficient burn without snuffing out the fire. An easy basket design uses an 18-inch grill grate, some flexible metal to bend around it, and a few bolts to hold the whole thing together.
Step Five: Decorate your smoker and fire it up!
After your smoker construction is complete, it’s time to make it your own! Paint the outside of the drum in your favorite team colors or stencil flames up the side—or leave it plain and “rustic” if you’re not into the fancy schmancy stuff. Another popular modification is adding a barbeque tool rack to the top lid.
And once it’s time to fire that baby up, remember the most important ingredient in meat smoking: patience! It’s hard to believe in this crazy modern world, but some things simply cannot be rushed. Smoked meat is one, so let your DIY project do its thing and enjoy the tasty results!
Because a DIY smoker is way more impressive than a store-bought one
At San Diego Drums & Totes, we’ve got just what you need to make it an epic summer. This year, impress your friends not only with your killer dry-aged rib-eye steaks, but also with your “Yes I made it” smoker. Drop by one of our locations in San Marcos or Lemon Grove to take a look at our collection of new, reconditioned, and used 55-gallon metal drums, from as low as $20.


